Git and the tech community as a whole has recently been transitioning to using the term “main” to describe the new default branch. Other code hosting platforms like GitHub have made the change; and GitLab as another one of the public git hosting platforms has also made the change as of version 14.0 for self-hosted versions that shipped on June 22, 2021.
GitLab has previously made the Phase 1 change to GitLab.com users. Going from master to main doesn’t have to be daunting, in fact changing our git repositories master branch name from master to main can be quite a quick and easy process to follow. You don’t even need to create a new git repository.
Default Branch
If you are still using “master” as the default Git branch name then you may be thinking about renaming your branch on existing projects. But how do you do this?
Here we talk about using GitLab to rename master branch to main. Git repositories are one of the most popular source tracking tools in use today and renaming master to main has become more of a spotlight recently due to the master slave type notion that it implies. Many want to follow best practices and trends and change their git repo master to main.
The master slave terminology can sometimes make people feel isolated in the same sense that master slave is sometimes similarly associated with blacklist whitelist. By renaming our git branch to a new main branch, we can result in ‘main’ as our new branch. We can also update our tracking connection.
Renaming Your Local “Master” Branch To “Main”
To rename your local “master” branch on your machine, you’ll just need to run a simple one liner command. This will update your local master branch but not the remote branch. Later on we also need to look at renaming the remote master branch and changing the default branch name in the git repository.
$ git branch -m master mainNow we can run anther one liner that will tell us if we were successful
$ git status
On branch main
Your branch is up to date with 'origin/master'.

nothing to commit, working tree clean
Excellent, now that we can see that we have been successful in renaming our local branch we can do the same on our remote repository too as everything we have done so far has not left our computer.
At this stage we have just updated the current local head branch but we haven’t updated our remote repository. Our existing tracking connection is still pointing to master. This hasn’t resulted in a remote renamed branch.
Renaming The Remote Master Branch
Renaming a branch isn’t that simple. Unfortunately for us we need to create a brand new branch remotely and then update references to it in places like the default branch, protected branches and perhaps even our GitLab CI file too. This allows us to update our existing projects with a new default branch and change the default branch name.
As long as we are on our “main” branch still as we were before, we can push this new branch to the remote repository.
$ git push -u origin mainAt this stage we should be able to see that now our local repository is up to date with the remote branch name.
$ git status
On branch main
Your branch is up to date with 'origin/main'.

nothing to commit, working tree clean
Now that we have a new branch remotely, we need to make sure that we change the default branch in the project settings. You’ll need to make sure that you have at least Maintainer level access to be able to do this in GitLab.
This will allow us to avoid a remote rejected type error message when deleting our old master branch in our git repository. Head on over to your repository on GitLab.com or self-hosted GitLab instance and go to Settings -> Repository. At the top of the settings page is the Default branch
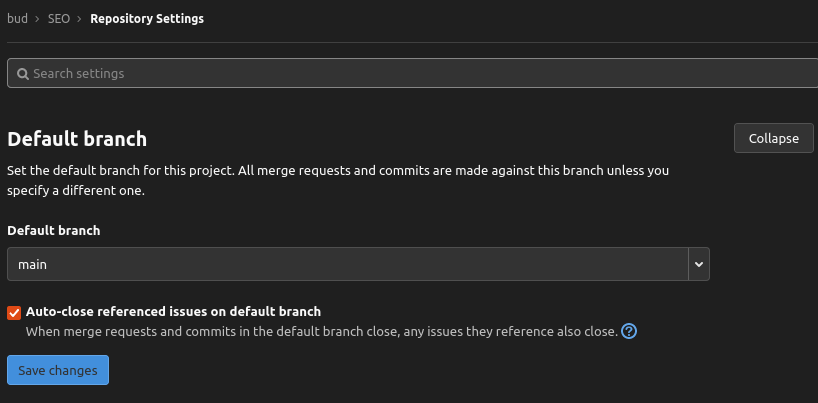
Once we’ve changed this to main and saved, we can scroll down a little further and make changes to our Protected branches by protecting our new main branch.
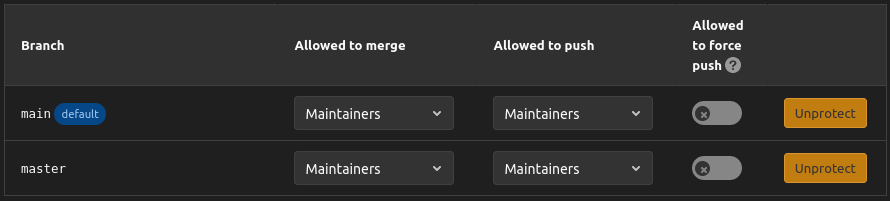
By default, Maintainers are allowed to push and merge to a protected branch, so you may wish to either select these default settings or specify your own if you use custom settings for your current master branch.

Now that’s done, we can go and unprotect our master branch which is going to allow us to delete it. Just click the yellow Unprotect button to the right.
This will unprotect what was once our default branch, known previously as the master branch. If we don’t perform this step we’ll see a remote rejected error when we attempt to delete this git branch.
From our local machine we can issue a delete command to the remote GitLab server to delete the old default branch, which was the master branch.
$ git push origin --delete masterWhat we should see now is success that we’ve been able to delete the old initial branch called master and finish the process to change over to our main branch.
$ git push origin --delete master
To gitlab.hatchet.com.au:bud/seo.git
- [deleted]         master
And that’s it! We’ve now been able to update our local branch, change our remote master branch and rename master to main, plus update our local branch and local git repository.
Git Repository
There are many types of different git repositories in use today. For ones that are used by a team of collaborators you may have other files affected that you need to think of, areas in your code where perhaps an error message or new default needs to be specified.
The main branch might need to be explicitly defined as a git branch in your GitLab CI file or other CI/CD pipeline. This will all depend on your exact setup and are things that this blog post doesn’t aim to solve for your unique circumstance. A pull request may be necessary in some cases to replace the term master.